Kool Music Mixer

User manual

Preview edition, 8 October 2026. Kool Music Mixer is still being built, and this manual is written from the build as it stands. Things will move before winter; this page moves with them.

Start here

What Kool Music Mixer is

A two-deck (and, when you want them, four-deck) music player and mixer for the music you already own. Point it at your music folder and it reads every file, works out each track's tempo, key and loudness in the background, and gives you decks, a mixer, cue pads, loops and a library to play it all from. It runs on your own PC.

It is built for listening at home first. A DJ controller is optional: everything can be worked from the screen.
Your music stays yours

  • Your files are never changed. Levelling, EQ, trim and tempo are all applied as the music plays. Nothing is written into your tracks.
  • Your music never leaves your computer. No audio is uploaded, stored or streamed anywhere.
  • One thing may go online, and you can switch it off: looking up a record's cover. Only the artist's name and the album's title are sent. See Options, Library.

Your first five minutes

  1. Open Import and folders, from the top bar or the foot of the library's list, and choose your music folder. Start the scan. You can stop it at any time.
  2. Tracks appear in the library as they are found. Tempo, key and loudness fill in behind them, a few seconds a track, while you carry on.
  3. Click a track in the library to highlight it.
  4. Press LOAD on deck A (the key beside the deck's name), or drag the track onto the deck.
  5. Press the play key. Bring the channel's fader up if it is down.

That is a track playing. Everything else in this manual is what you can do next.

What it plays

MP3, AAC / M4A, WAV, FLAC, Ogg and AIFF. WMA files are not played; they are listed for you under Unsupported files in the library, so nothing goes missing without a word.

The main screen

Two decks either side of the mixer, with the waveform strips above them
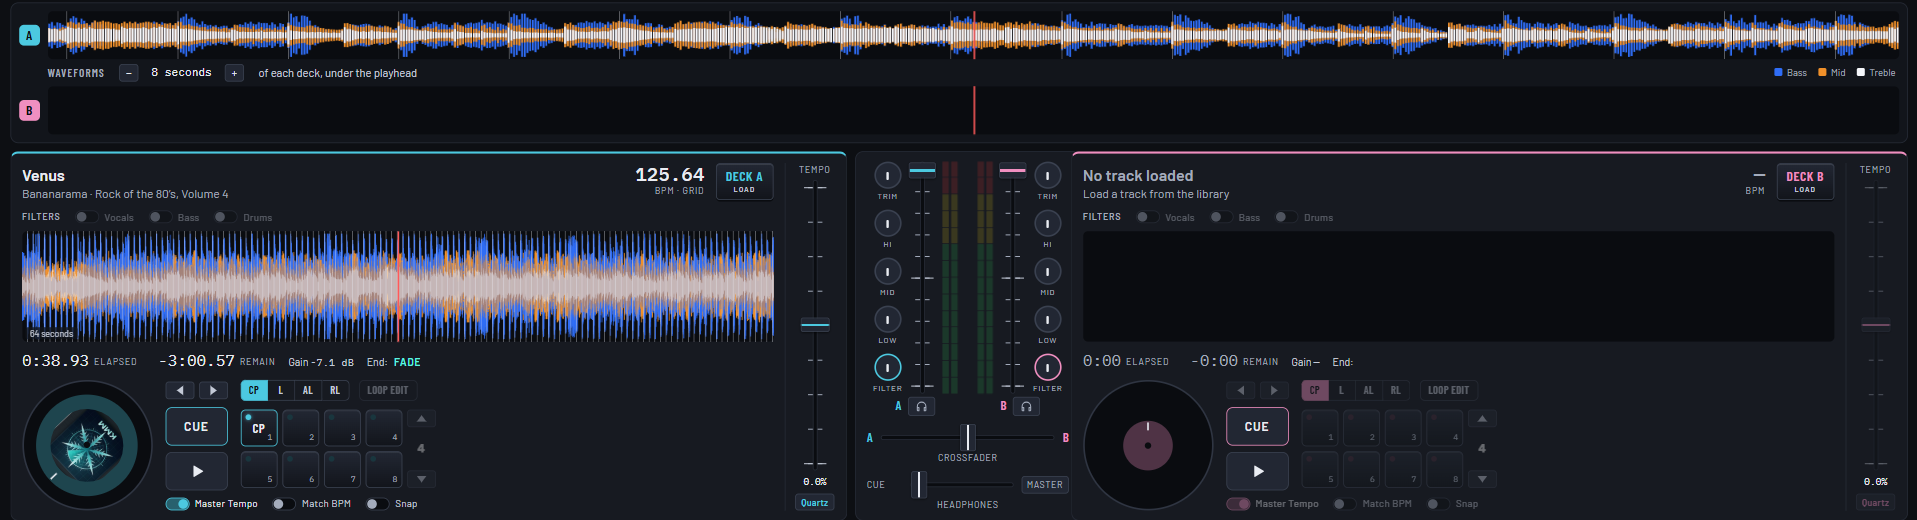
The waveform strips, deck A, the mixer, and deck B. The library is below.

The top bar

DJ mix / AutoPlay
How the next track is brought in. DJ mix leaves it to you. AutoPlay, where the app plays on by itself, is still being built: the switch is there, the mixing behind it is not yet.
Mode
How much the screen shows: Simple, Intermediate, Pro or Custom. See Modes.
The controller light
A green light and a name when a DJ controller is connected. Click it for the controller's page. With none connected there is nothing there.
MASTER
The level of the whole mix going to your speakers.
− 80% +
The size of the decks on the screen. AUTO fits them to the window.
C & D
Shows or hides decks C and D. See Four decks.
The five keys at the right
Show or hide the library's list of sections; show or hide the waveform strips; rip a CD; Import and folders; Options. The ripper and Options open in a tab of their own.

Modes: Simple, Intermediate, Pro, Custom

The main screen on Simple: each deck is a track, a waveform, the platter, PLAY and CUE
Simple.
Simple
For hearing your records. A deck is a track, its waveform, the platter, PLAY and CUE; the mixer is the faders and the crossfader.
Intermediate
A two-deck mixer as most people know one. Adds the cue pads, the tempo fader, Master Tempo and Match BPM, the EQ and filter knobs, the headphone keys and the waveform strips.
Pro
Everything: the Vocals, Bass and Drums filters, loops of every kind, Loop Edit, Snap, the fine arrow keys.
Custom
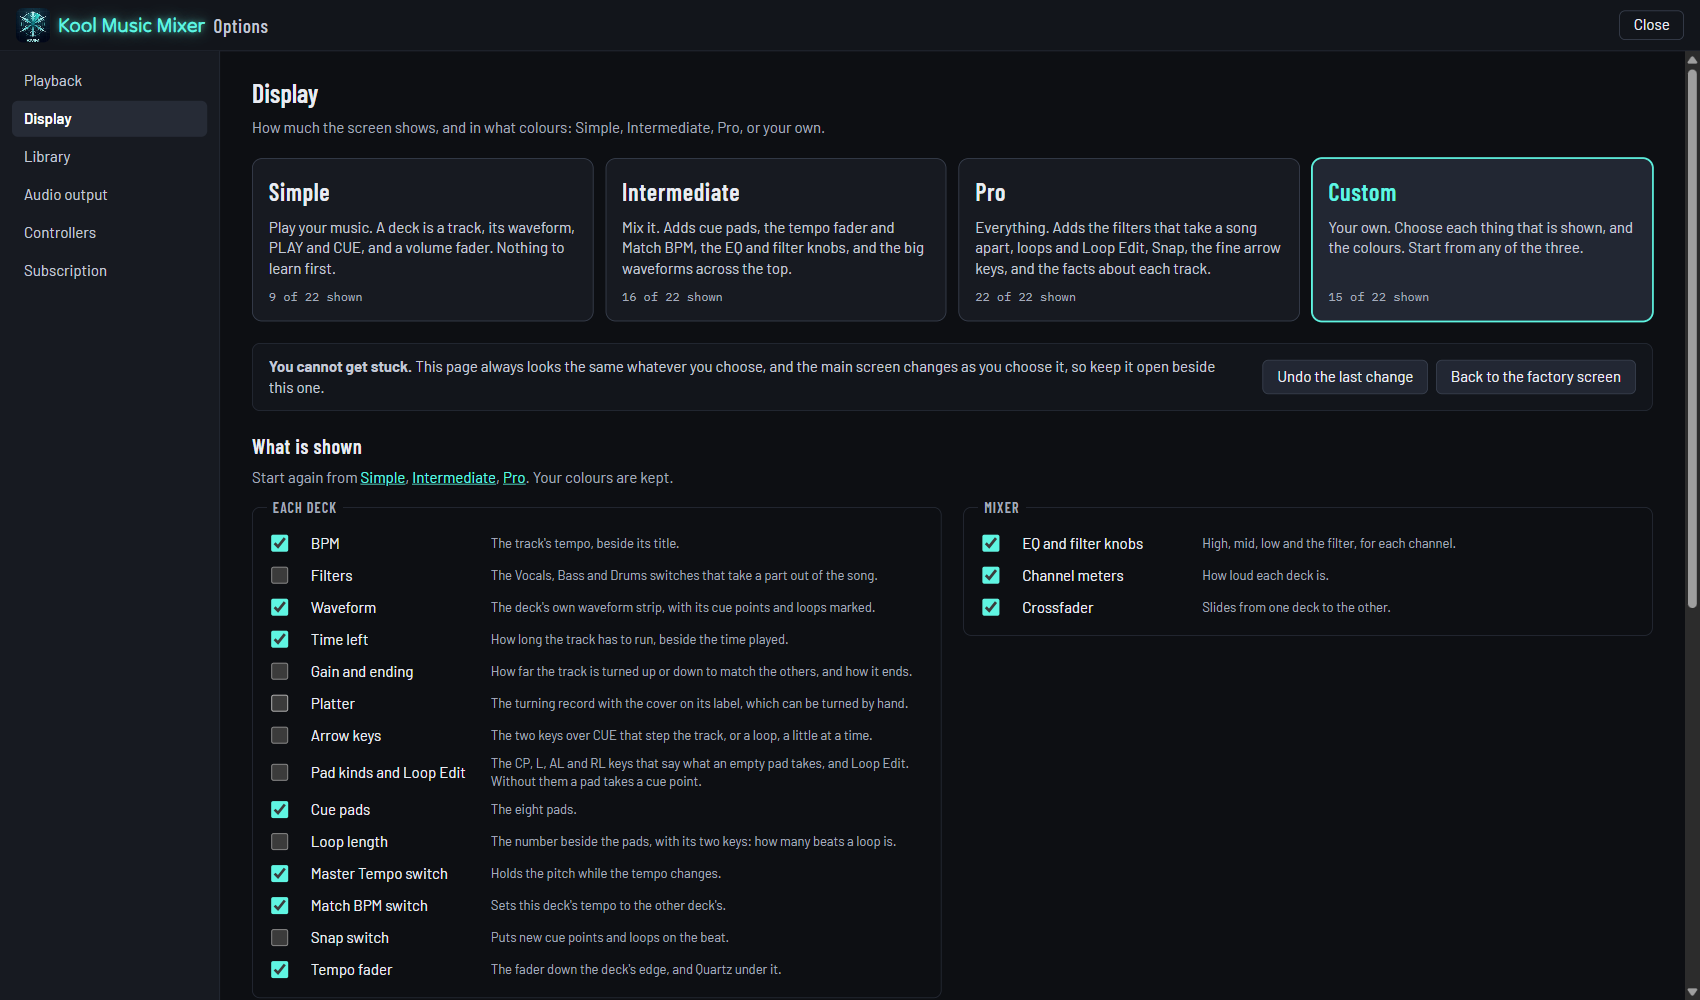
Your own. Choose each part, and the colours, in Options, Display.

Change it from the Mode list in the top bar or from Options. The Mode list is never hidden, so there is always a way back.

The waveform strips

Across the top, one strip for each deck, each showing a few seconds of its track scrolling under a red play line in the middle. Bass is blue, mids orange, treble white. Stacked like this, two tracks' beats can be lined up by eye.

  • Zoom: the − and + keys, or the mouse wheel over a strip. Zoomed right in, the edge of a single beat can be seen.
  • Move through the track: take hold of the red play line and carry it. Let go and the deck goes there. On a paused deck what is under the line is heard as you carry it, and holding the line at either edge scrolls on through the track.

Four decks

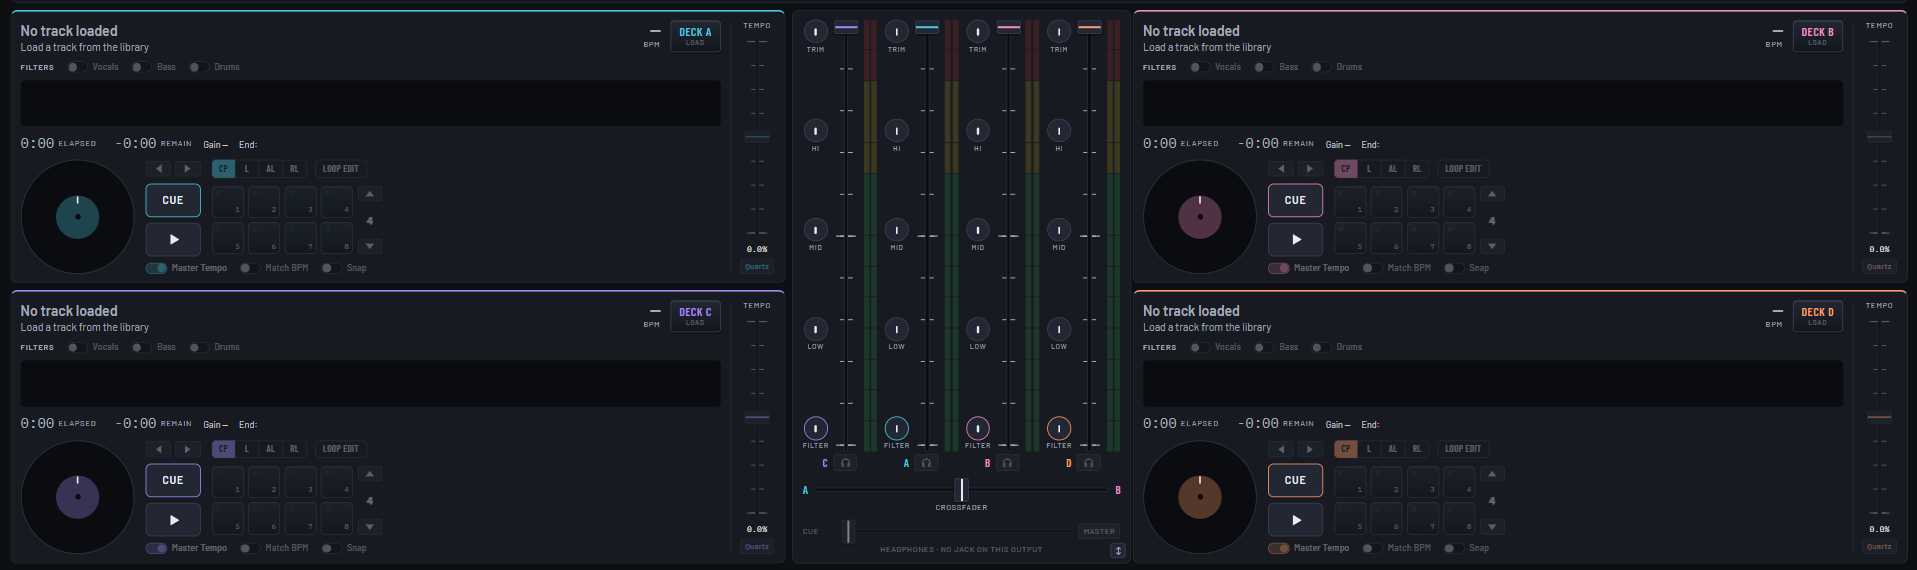
Four decks, with the mixer between them the height of both rows
Decks C and D under A and B, the mixer between.

The C & D key in the top bar brings decks C and D out under A and B, and puts them away again. They cannot be put away while either is playing: the screen says so and leaves them where they are.

With four decks the mixer can be the height of both rows, its knobs spread evenly down it, or the height of one deck with its knobs together. The small arrow key in the mixer's lower right corner switches between the two.

The decks

Loading a track

  • Highlight a track in the library and press the deck's LOAD key.
  • Or drag a track from the library onto the deck.

A deck that is playing will not take another track: pause it first. A slip of the hand should never cut off what the room is hearing.

What a deck tells you

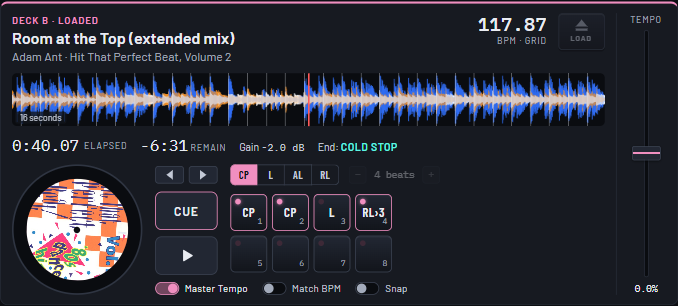
Title, artist and album
Across the top, with the record's cover on the platter.
BPM
The track's tempo as it is playing now, to the hundredth. Move the tempo fader and it follows.
ELAPSED and REMAIN
How far in, and how long is left, to the hundredth of a second.
Gain
How far this track is being turned down to match the others. See Levelling.
End
How the track finishes: COLD (it stops) or FADE (it fades out).

When a playing deck is nearly out of track its frame flashes, so you see it from across the room. Thirty seconds before the end unless you choose otherwise in Options, Playback.

The deck's own waveform

A deck whose waveform has been zoomed with the mouse wheel
A deck's strip zoomed in round the play line.

Each deck shows its whole track, with the red play line where the deck is, the cue point, and a numbered mark for each pad.

  • Click anywhere on it to go there.
  • Drag the red play line to carry the deck along the track. Paused, you hear what is under the line as it goes. Playing, the deck goes there when you let go.
  • Mouse wheel zooms in round the play line, from the whole track down to a few seconds. Wheel back out past 64 seconds for the whole track again.

PLAY and CUE

The play key
Plays and pauses.
CUE
Paused, it marks the place the deck is at as its cue point. Playing, it takes the deck back to that place and waits there, as a CD deck's CUE key does.

The platter and the arrow keys: finding a place by hand

Drag the platter left and right to move through the track, as a record is pushed by hand. On a paused deck you hear it as it moves.

The two arrow keys over CUE step the deck a little earlier or later:

  • Click: a tenth of a second.
  • Shift-click: one second.
  • Ctrl-click: 44 samples, a thousandth of a second, for the very edge of a beat.

Zoom the strip in first and those steps can be seen as well as heard.

Tempo: the fader, Quartz, Master Tempo and Match BPM

The tempo fader
Down the deck's right edge. Down is faster, up is slower, as on a turntable and on a DJ controller. Its marks are the middle, where the tempo is as recorded, and each eighth of its reach. Double-click it for the recorded tempo.
Its reach
How far it goes either way: 6, 8, 10 or 16 percent. Set in Options, Playback.
Quartz
Under the fader. Back to the recorded tempo in one press, as a turntable's quartz lock does. It works while the deck plays.
Master Tempo
On, a change of tempo leaves the pitch alone. Off, the pitch rises and falls with the tempo, as a record's does.
Match BPM
Keeps this deck's tempo matched to the deck that is playing, within the fader's reach. The track needs a BPM for it to work.

Filters: Vocals, Bass, Drums

Three switches at the top of each deck. Each one on takes that part out of the track as it plays: vocals off for an instrumental, drums off for a breakdown, and so on, in any combination.

  • A track has to be prepared first. The app does that in the background, and a bar above the library shows how far along it is. Until a track is prepared its switches are greyed.
  • They can be switched while the track plays.
  • Preparing can be switched off altogether in Options, Library.

Levelling: one track does not jump out after another

Every track is measured when it comes into the library. A track mastered louder than the reference is turned down as it plays, by the amount the deck shows as Gain. A quieter track is left alone, since turning it up could distort it. Your files are not touched. It can be switched off in Options, Playback.

Cue points and loops

The eight pads

Each deck has eight pads. A pad holds a place in the track: a cue point or a loop. They are kept with the track, so they are there the next time you load it.

The four small keys over the pads choose what an empty pad takes when you press it:

CP: cue point
Marks the place the deck is at. Press the pad again, any time, to go there.
L: loop
A loop starting where the deck is. The deck plays straight through it; it only goes round when a regressive loop sends the deck back to it, or when you press its pad to hear it.
AL: auto loop
A loop starting where the deck is. Reaching it, the deck goes round it until you let it go.
RL: regressive loop
Marks the place the deck is at. Reaching that place, the deck goes back to a loop (L or AL) on another pad and round that until you let it go. Put a loop on a pad first, so it has somewhere to go back to.
  • Right-click a pad to clear it.
  • Click the pad of a loop that is going round to let it go and play on.
  • Shift-click a regressive loop's pad to turn its light off, so it waits to be pressed instead of firing by itself.

A loop's length

Loops are measured in beats: 4, 8, 16, 32, 64, 128 or 256. The up and down keys to the right of the pads set the length the next loop takes. Press a loop's pad and the same keys change that loop's length, from the same start.

Snap

On, a new cue point or loop goes on the nearest beat of the track's grid, not exactly where the deck is. Off, it goes exactly where the deck is. A loop keeps its start when its length is changed.

Loop Edit and Trim End: a loop that does not quite sit

Sometimes a loop is set a hair off the beat, and it burps where it goes round. Two keys put that right without making the loop again.

  1. Press the loop's pad so it is going round and you can hear it.
  2. Press Loop Edit. The two arrow keys over CUE now slide the whole loop earlier or later, and leave the deck where it is. A tenth of a second a click; Shift for a second; Ctrl for 44 samples.
  3. If it is the length that is wrong, press Trim End as well. The arrows now move only the loop's end: a hundredth of a second a click; Shift for a tenth; Ctrl for 44 samples.
  4. Listen as you go. What you set is kept with the track.

Where a loop goes round, its end and its start are blended over a few thousandths of a second, so even a loop cut mid-sound does not click.

The mixer

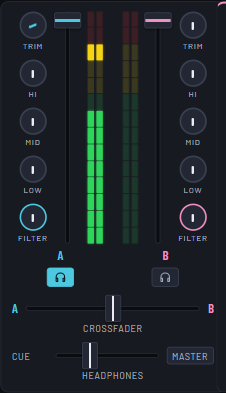
The mixer: TRIM, HI, MID, LOW and FILTER knobs, faders, meters, headphone keys, the crossfader and the headphones' mix
The mixer with two decks.

A channel, top to bottom

TRIM
The deck's level before its fader. In the middle the track is as it is; fully up it is 9 dB louder; fully down it is silent. It belongs to the deck, so it stays where you set it for the next track loaded there.
HI, MID, LOW
Boost or cut the top, the middle and the bottom of the sound.
FILTER
One knob that sweeps. Turned one way it takes away more and more of the top; the other way, more and more of the bottom. In the middle it is off.
The fader
The channel's volume. Its marks are each tenth, with the ends and the middle longer. Double-click it for full.
The meter
Left and right, after the fader: dark with the fader down, rising as you bring it up. If nothing is going to the room from that deck, nothing shows.
The headphone key
Under the channel's letter. See Headphones.

Working a knob

  • Drag up or down on it to turn it.
  • Double-click to put it back in the middle.
  • With the keyboard: the arrow keys turn it a step, and Home puts it back in the middle.

The crossfader and the master

The crossfader slides from one side to the other. In the middle both sides are at full level; at either end one side is gone. Decks A and C are on the left, B and D on the right. Double-click it for the middle.

The master is the level of the whole mix. Its meter is in the top bar. The headphones do not follow it.

Headphones

Hearing the next track before the room does

Press the headphone key under a channel's letter and that deck is sent to your headphones before its fader. Fader down, the room hears nothing of it; you hear all of it. Line it up, then bring the fader in.

The headphones' mix (CUE … MASTER)
The slider under the crossfader. At the left you hear the cued decks alone; at the right, the master alone; in between, some of each.
MASTER
The key at the slider's right: adds the master to the cued decks.

What it needs

A sound output with a headphone jack of its own: in practice, a DJ controller's sound card, which has four channels (two for the room, two for the headphones). Choose it in Options, Audio output.

On ordinary speakers there is nowhere to send the headphones. The keys are dimmed, and their tooltip says why.

The library

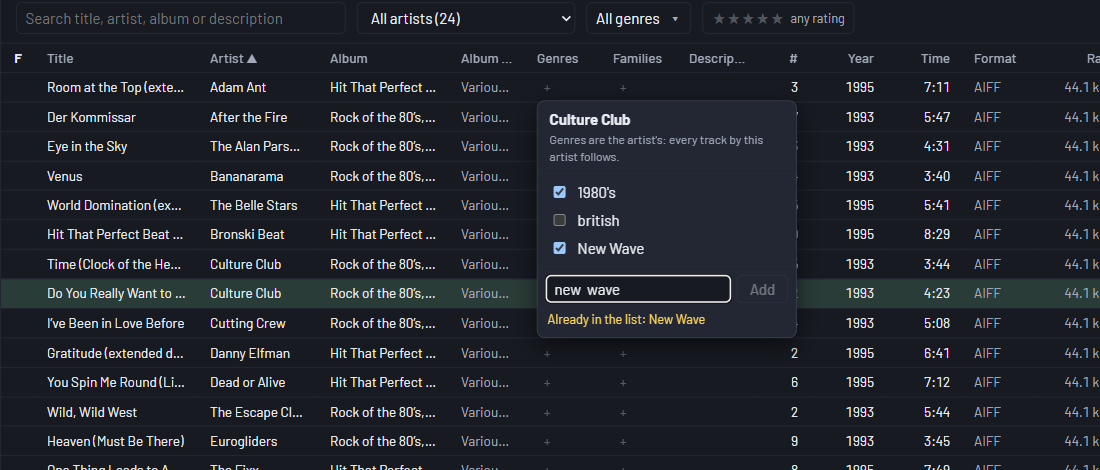
The library grid with its search box, artist and genre filters and columns
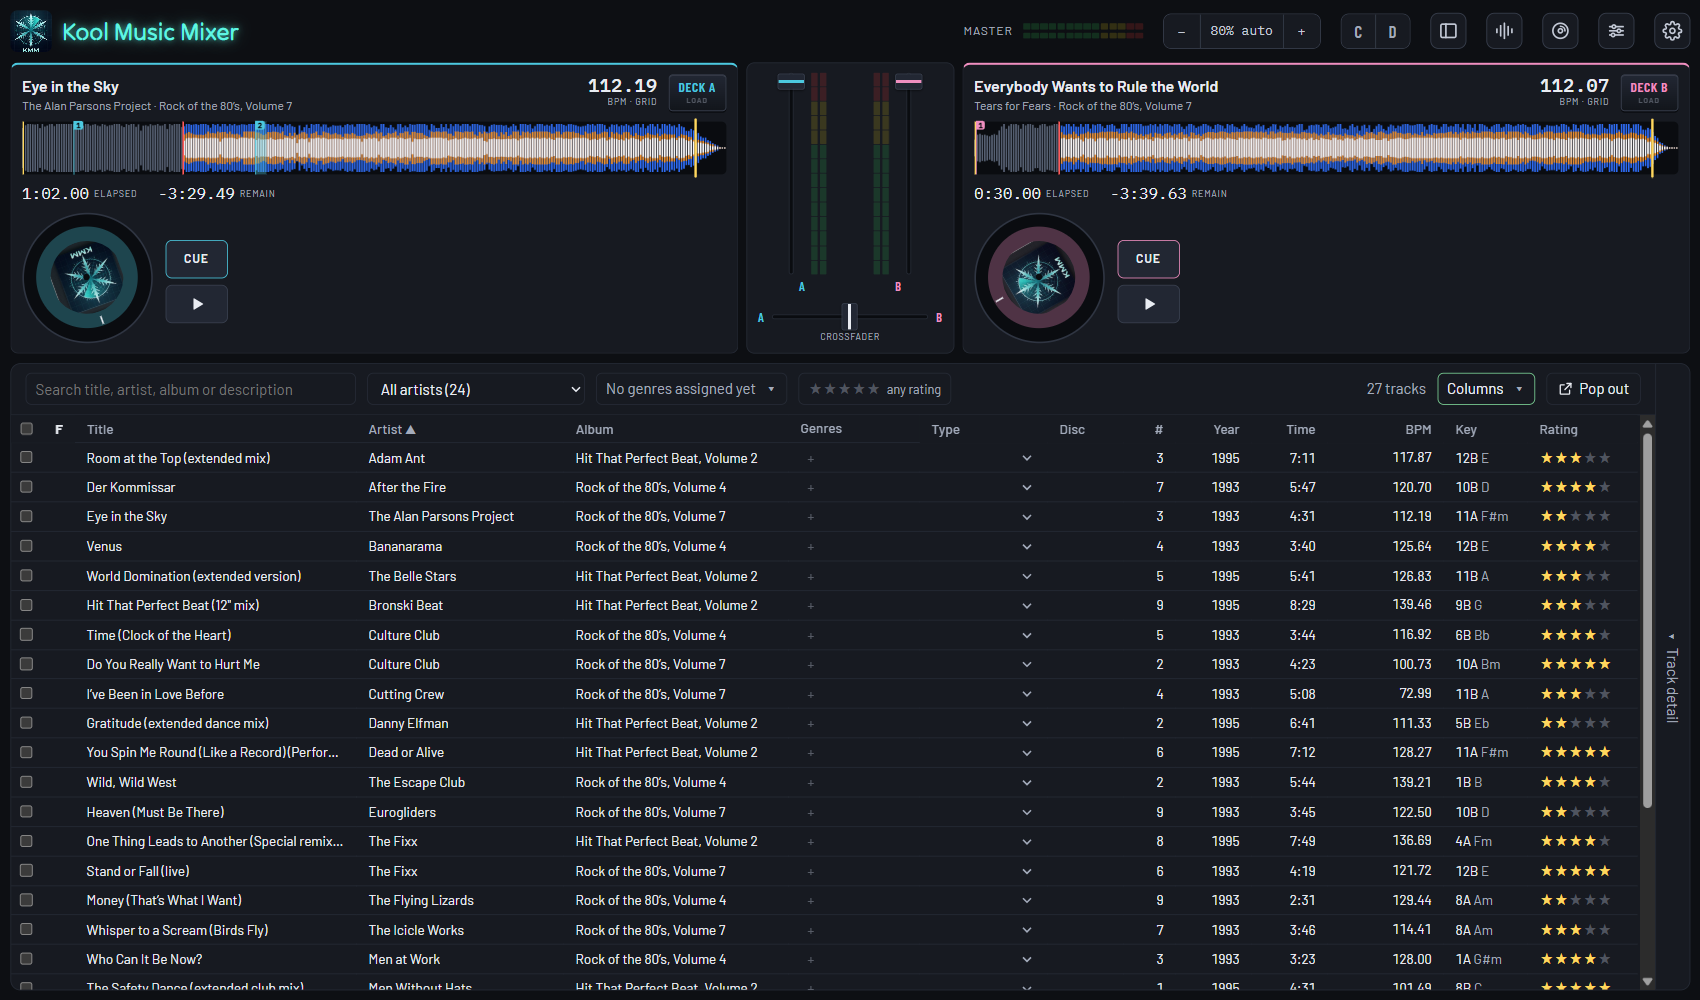
The library.

Finding a track

Search
Title, artist, album or description. Type a number and it searches BPM as well.
All artists
Narrows the grid to one artist.
Genres
Tick the genres you want.
Rating
Show only tracks of so many stars or more.
Sort
Click a column's heading.

The grid

  • Click a row to highlight it. LOAD takes the highlighted track.
  • Click the stars to rate a track.
  • Columns chooses which columns show, and fits them to the window.
  • Track detail folds out from the right edge with everything known about the highlighted track.
  • Pop out moves the library to a tab of its own, to drag to a second monitor. The decks then fill the main window.

The list at the left

Collection is everything. Unusual endings gathers tracks that finish in a way worth knowing about before you mix out of them. Unsupported files lists what was found and cannot be played. Import and folders, at the foot, is where music comes in.

Bringing music in

Importing a folder

Open Import and folders, choose your music folder, and start the scan. It only scans when you ask, and there is a Stop key. Thousands of files are fine.

What is worked out for each track

In the background, a few seconds a track, with nothing for you to do:

  • BPM, to the hundredth, and a beat grid.
  • Key.
  • Loudness, for levelling.
  • Where the music starts and ends, and how it ends.
  • The waveform the decks draw.
  • The record's cover, from in or beside the files, or looked up by artist and album if you allow it.

Ripping CDs

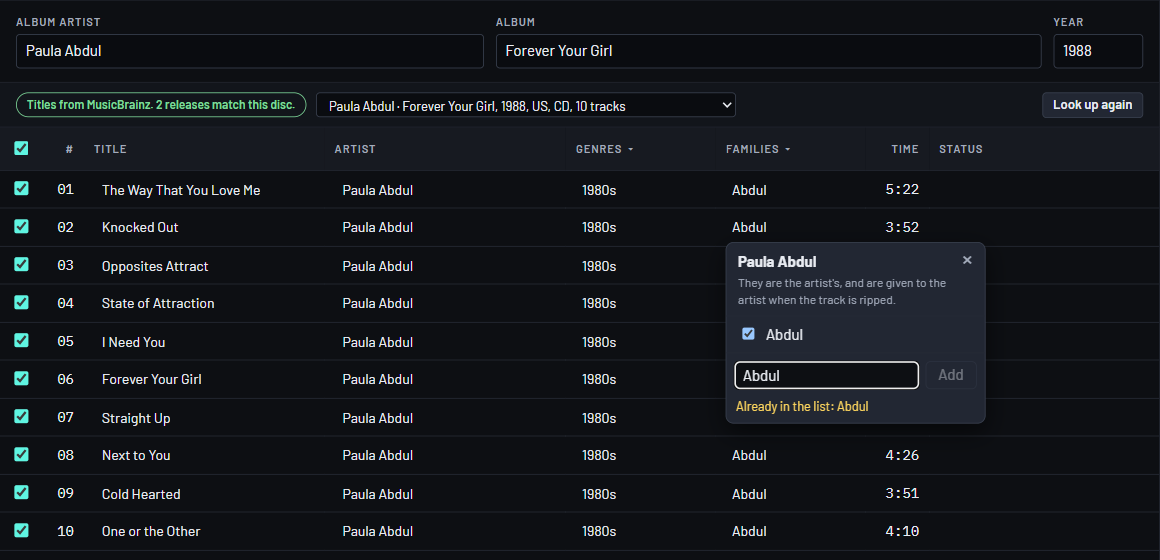
The CD ripper, with a row for each track and columns for genre, family and type
The ripper, with a disc in.

Ripping a disc

  1. Open the ripper from the disc key in the top bar. It has a tab of its own.
  2. Put a disc in. Its titles are looked up for you: online by the disc's own fingerprint, and from the disc itself where it carries them.
  3. Choose the format: MP3, WAV, FLAC or AIFF, and the quality.
  4. Tick the tracks you want and start.

Each ripped track goes straight into the library and is analysed like any other. The disc is ejected when it is done, unless you switch that off.

Setting genre, family or type for several tracks at once

  • Click a row's number to highlight it. Shift-click for a run of rows; Ctrl-click for one more. The menus in a column's heading then apply to the highlighted rows.
  • The small arrow in a cell fills down: every track below gets what that row has.
  • With nothing highlighted, a heading's menu fills only the rows that are still empty in that column.

Neither way overwrites a row you have already filled in. A small number on a cell says it holds more than one value.

DJ controllers

Plugging one in

Plug the controller in by USB. Within a couple of seconds its name shows in the top bar with a green light, and its controls work. Nothing to install in the app, and nothing to switch on.

A control on the board does exactly what the same control on the screen does, and the screen follows it. The board's lights and level meters follow the decks.

The Pioneer DJ DDJ-FLX4 works out of the box. Any other MIDI controller can be taught.

Sound through the controller

A controller with its own sound card shows up as a sound output. Choose it in Options, Audio output and the mix comes out of the controller's master jacks, with your headphones on its headphone jack.

The DDJ-FLX4, control by control

On the board In Kool Music Mixer
PLAY/PAUSE, CUE The same
BEAT SYNC Match BPM, on or off
LOAD Loads the highlighted track
BROWSE knob, turned Moves the highlight up and down the library
JOG wheel Moves the deck, as the platter on the screen does
TEMPO slider The tempo fader
Channel fader, TRIM, EQ HI / MID / LOW The same
CFX knob The channel's FILTER knob
CH CUE (headphones) The channel's headphone key. It lights
MASTER CUE, HEADPHONES MIX The master in the headphones; the headphones' mix
Crossfader, MASTER LEVEL The same
Pads 1 to 8, HOT CUE mode The deck's eight pads. A set pad lights
SHIFT + pad Clears that pad
4 BEAT / EXIT Lets a loop go
Pads 1 to 3, PAD FX 1 mode Vocals, Bass, Drums filters. Lit while on
Pads 4, 5, 6, PAD FX 1 mode Snap; Quartz; Trim End
Pads 1 to 4, PAD FX 2 mode What an empty pad takes: CP, L, AL, RL
SHIFT + BEAT SYNC Master Tempo, on or off
SHIFT + CUE Back to the start of the track
SHIFT + 4 BEAT / EXIT Loop Edit, on or off
SHIFT + IN, SHIFT + OUT The loop going round, a tenth earlier or later
SHIFT + LOAD Loads the highlighted track and plays it
SMART FADER DJ mix / AutoPlay
SMART CFX The screen's Mode, one step a press
FX SELECT Shows or hides decks C and D
The 1 / 2 / 1&2 switch Which decks the board works: see below

Four decks from a two-deck board

  1. Press FX SELECT to bring decks C and D onto the screen.
  2. Move the 1 / 2 / 1&2 switch to 1&2. The board's left side now works deck C and its right side deck D: every button, pad, fader, knob, light and meter.
  3. Move it back to 1 or 2 for decks A and B.
  • A small controller, lit in the deck's colour, sits in the lower left corner of each deck the board is working. The top bar says which pair.
  • With decks C and D put away, the switch does nothing.
  • Picking up a fader. After the switch, your hand is where the other deck's fader was. A deck that is not playing is set to wherever the board's faders and knobs are. A deck that is playing is left alone, so the room hears no jump: bring each fader or knob to where that deck's stands and it takes hold from there.

The Controllers page

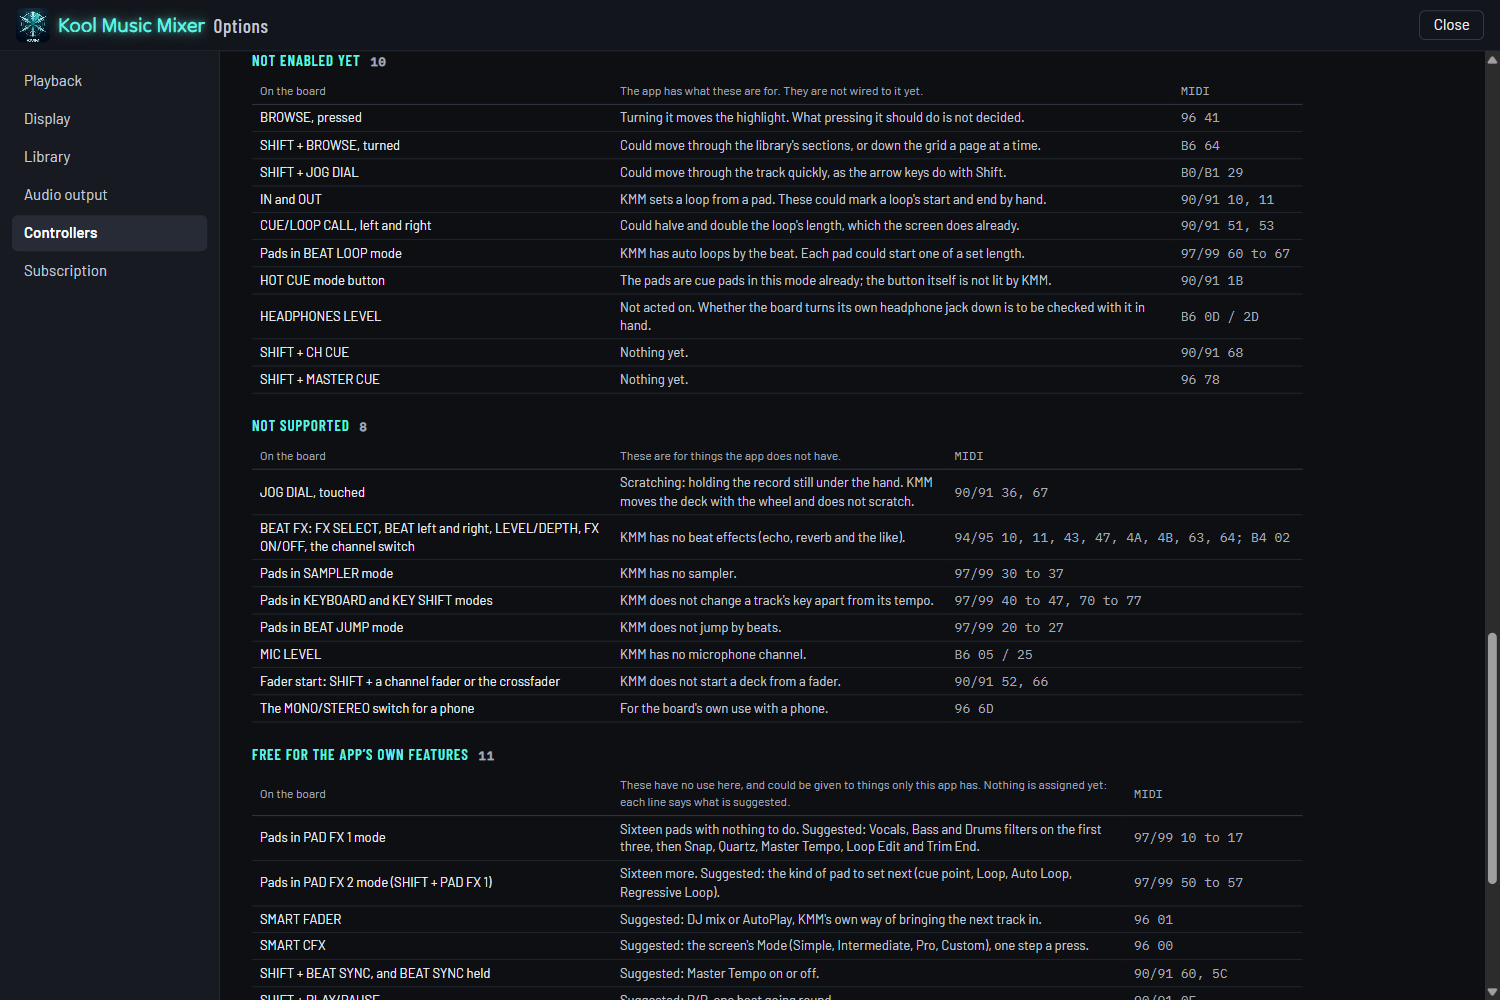
The Controllers page listing a board's controls that are not enabled yet, not supported, and free
What a board's map leaves alone, and why.

In Options, under Controllers. For each board connected it lists every control that is mapped and what it does. Work any control on the board and its row lights up: the quickest way to see that the board and the app agree. Under that are three lists: controls not enabled yet, controls for things the app does not have, and controls still free.

Teaching the app a controller it does not know

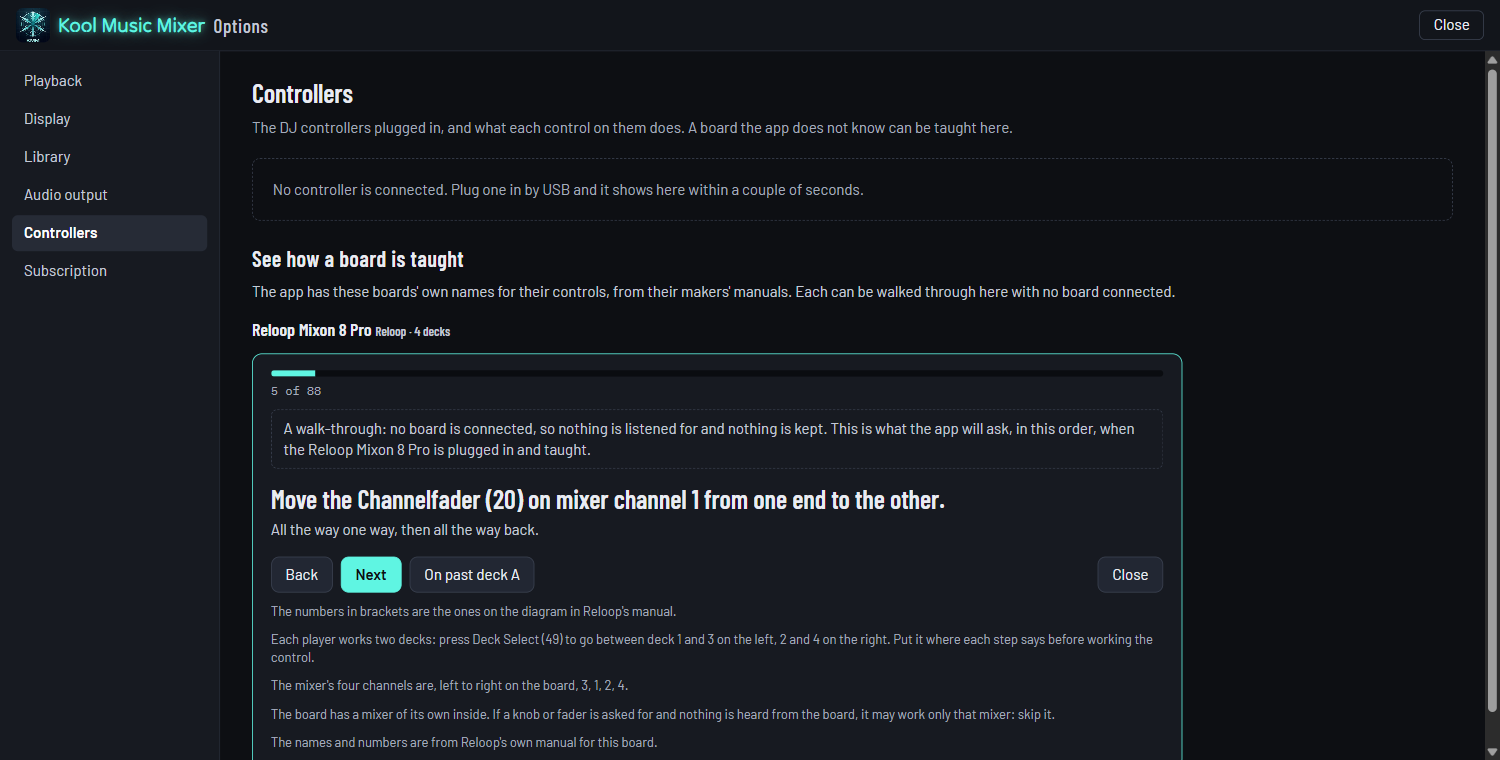
The teaching screen asking for one control at a time in the board's own words
One control at a time, in plain words.

A board the app has no map for shows on the Controllers page as connected and not understood, with a key: Teach the app this board.

  1. The app asks for one control: "Press PLAY/PAUSE on deck A."
  2. You work that control on the board. The app takes what it sent and asks for the next.
  3. If the board has no such control, press Skip. Back does the last one again.
  4. At the end, keep it. The board works from that moment.
  • You never see a number. The app works out what each control sends from how it behaves.
  • Work the wrong thing, a fader when a button was asked for, and it says so instead of learning it wrong.
  • A two-deck board is 46 controls, about three minutes. Stop and keep at any point leaves a board that does that much.
  • For some boards the app already has the names from the maker's manual, and asks in the words printed on the board. Those can be walked through on the same page with no board connected, under See how a board is taught.

Options

The cog in the top bar. Options opens in a tab of its own, so it can sit beside the main screen while you change things. Changes take effect at once.

Playback

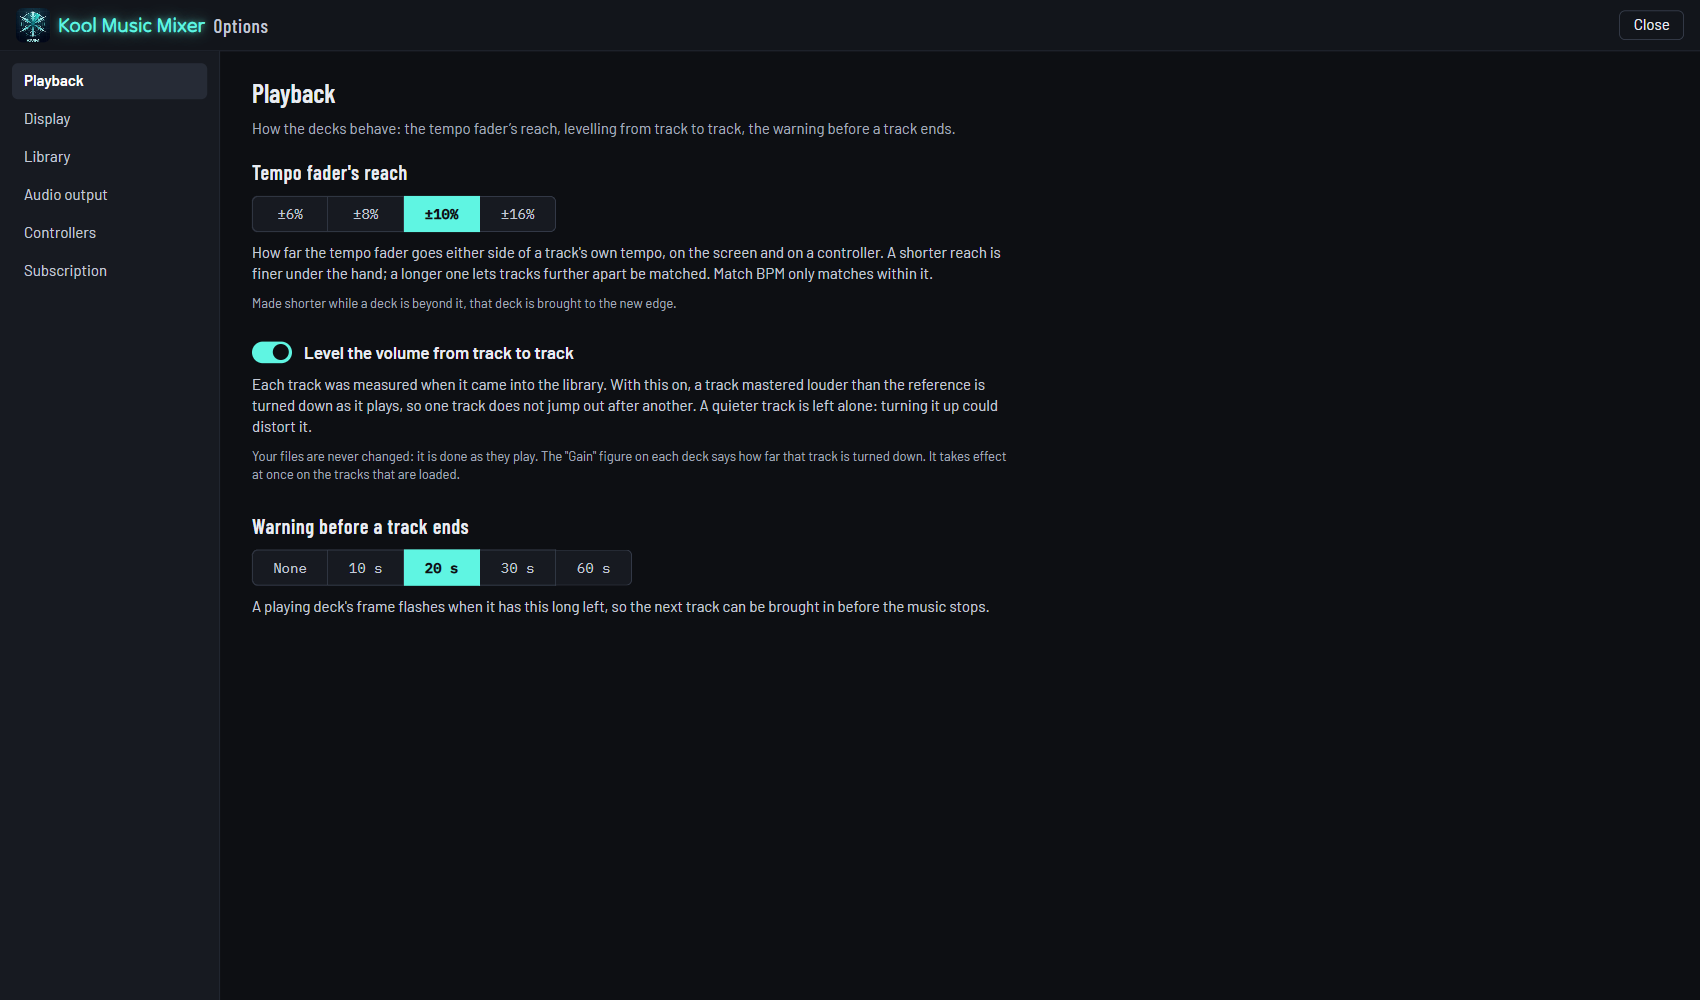
Options, Playback: the tempo fader's reach, levelling, and the warning before a track ends
Tempo fader's reach
±6, 8, 10 or 16 percent. Shorter is finer under the hand; longer matches tracks further apart.
Level the volume from track to track
On or off. See Levelling.
Warning before a track ends
None, 10, 20, 30 or 60 seconds: when a playing deck's frame starts to flash.

Display

Options, Display, on Custom: the four levels and the parts that can be shown or hidden

Simple, Intermediate, Pro, or Custom: show or hide each part of the screen, and choose the colours of the decks, the words, the waveforms and the background. If a colour makes something hard to read, the page says which.

You cannot paint yourself into a corner. The Options page itself is never recoloured, and it has Undo the last change and Back to the factory screen.

Library

Look up covers online
When a record's cover is not in or beside its files, look for it online. Only the artist's name and the album's title are sent. Off, nothing is asked of anyone.
Prepare tracks for the filters
Whether tracks are prepared in the background for the Vocals, Bass and Drums filters.

Audio output

Options, Audio output: the outputs on this PC and how far the sound runs behind
Where the sound goes
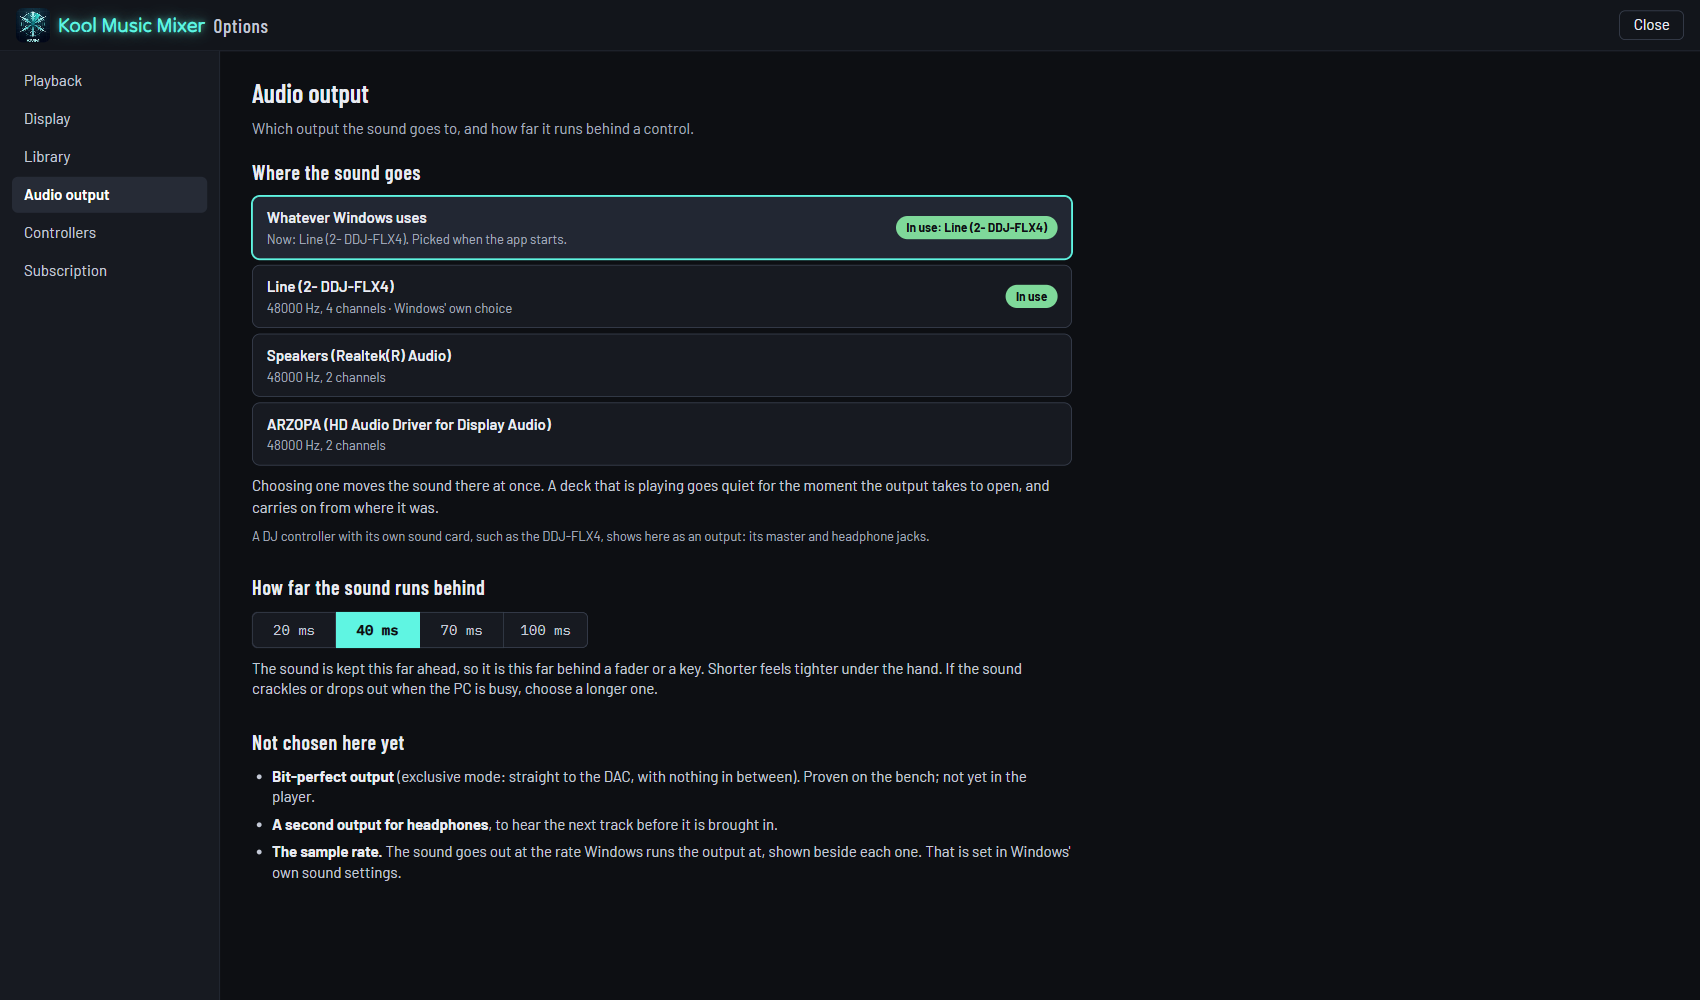
Every sound output on your PC, and which one is in use. Choose one and the sound moves there at once, even mid-track.
How far the sound runs behind
20, 40, 70 or 100 thousandths of a second. Shorter feels tighter under a fader. If the sound crackles when the PC is busy, choose a longer one.

Keys and mouse

The whole sheet

Where Do this For this
Library Click a row Highlight it for LOAD
Library Drag a row onto a deck Load it there
Deck waveform Click Go to that place
Deck waveform Drag the red line Carry the deck along the track
Deck waveform, strips Mouse wheel Zoom
Platter Drag left or right Move through the track
Arrow keys over CUE Click A tenth of a second
Arrow keys over CUE Shift-click One second
Arrow keys over CUE Ctrl-click 44 samples
Arrow keys, Loop Edit on Click / Shift / Ctrl Slide the loop: 0.1 s / 1 s / 44 samples
Arrow keys, Trim End on Click / Shift / Ctrl Move the loop's end: 0.01 s / 0.1 s / 44 samples
Pad, empty Click Set what the CP / L / AL / RL keys say
Pad, set Click Go there; or let its loop go
Pad, set Right-click Clear it
Regressive loop's pad Shift-click Its light on or off
Knob Drag up or down Turn it
Knob, fader, crossfader, tempo Double-click Middle (a fader: full)
Knob, with the keyboard Arrow keys; Home A step; the middle
Ripper Click a row's number; Shift; Ctrl Highlight rows

Good to know

A deck is playing and I hear nothing

  • Is the channel's fader up, and its TRIM not fully down?
  • Is the crossfader over on the other side?
  • Is the master up?
  • Is the sound going where you think? Look at Options, Audio output: the one marked "In use".

The Vocals, Bass and Drums switches are greyed

That track has not been prepared yet. The bar above the library shows how far along preparing is. See Filters.

A controller's fader does nothing after the deck switch

It is waiting to be picked up: bring it to where that deck's fader stands on the screen. See Four decks from a two-deck board.

I hid something and cannot find it

Set Mode, in the top bar, to Pro: that shows everything. Or, in Options under Display, Back to the factory screen.

What it is for

Kool Music Mixer is for playing and mixing your own music library. It does not record from streaming services, get round copy protection, or show lyrics.